
Team, team, team, the word alone sounds great, the big TV boss from IT Crowd praised the company's team spirit. In order to collaborate effectively over longer distances, corporate teams use the most widely used and popular video conferencing application - Microsoft Teams. Instructions on how to use it await you in the following lines.
The term "Teams" may be the first one we think of when we think of an application for video conferencing. But it can offer you much more - chat, file sharing, newsgroups, attendance system, creation and awarding of digital badges ("ebadges") and integration with other applications of the Microsoft 365 office suite (formerly known as "Microsoft Office"). What few people know is that Microsoft Teams also supports the public telephone network and VoIP telephony.
In the initial part of the tutorial, we will cover the absolute basics, more advanced users will be better served by the next planned installments.
The Microsoft Teams application is available in several versions that differ in features and price. However, there are also versions designed for education (called "Microsoft Teams for Schools") or government organizations that offer specific features and licensing options. We'll focus on the version for businesses, which you get as part of the aforementioned Microsoft 365 package and is suitable for businesses of all sizes.
So you install Microsoft Teams as part of the Microsoft 365 suite. You can find a specific step-by-step installation procedure for PC, Mac and mobile devices (with Android or iOs) in our article How to get started with Microsoft Outlook easily (in the Outlook free download section).
If you don't have the Teams app installed and for some reason don't want to install it (e.g. limited number of licenses or users), but still receive an email invitation to a meeting or video conference, use the Teams Online web app at https://teams.microsoft.com. Simply click the link in the email invitation, select Microsoft Teams Online, and follow the additional step-by-step instructions.
If you already have the app pre-installed, you should also be logged in with your Microsoft 365 user account (or Microsoft 365 corporate account). If you are not logged in or have not added your account to the app, log in with your Microsoft 365 username and password in the dialog box that automatically opens when you launch Microsoft Teams. The app will remember the information you enter after the first login, so you won't have to re-enter it the next time you open it.
If you get a service message or code when you try to log in unsuccessfully, you can find the meaning of the message or code directly on the Microsoft support site. If you are unable to complete the login process even repeatedly, there may have been an error on your domain or Microsoft 365 account - in this case, contact your IT department or IT service desk.
The look and feel of Teams varies not only by version, but also by device (desktop vs. mobile), operating system (Windows vs. iOS) and its settings (typically dark vs. light display mode). We'll explain and illustrate each element and feature using images from the PC version with Windows 11 in dark mode. The app looks like this when opened (names and group names are blurred for privacy reasons):
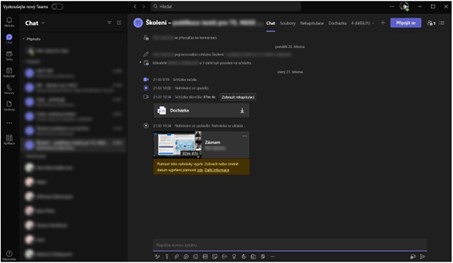
As you can see in the figure above, the "Chat" view is automatically selected when the app is launched, which is used for individual and group conversations, but you will also find records of the progress of meetings and video conferences, including attendance and any video recordings. You'll find the recordings in the chat for that meeting; you can click the three dots in the top-right corner of the recording preview to save the file to a local (or cloud) drive, or adjust the recording's expiration time (i.e., the length of time the recording will be accessible before it is automatically deleted).
To access the app's settings menu, click on the three dots icon next to your account image (you can see it at the top right next to the minimize window button). Once clicked, select the first option - Settings. This will open a dialog box with settings items sorted into categories (note: unlike Outlook, the Settings menu for Teams is identical for both the web and desktop applications):
And that's all for starters. In the next installment of the guide, we'll cover the basics of chatting and meetings, video conferencing, and taking video recordings, including practical tricks and tips. For example, you can keep yourself busy with more articles on our blog.

Copyright © 2026 - Algotech a.s., all rights reserved
| Personal data processing |
Terms and conditions