
The days of writing notes in pencil on paper are long gone. Most professions require knowledge of Microsoft Word, and those who don't have it are already lost. If you're just starting out with Word, we've got a guide to help you get to grips with the basics.
Microsoft Word is one of the most popular word processing programs in the world. In addition to being able to type text (which is what the regular pre-installed "Notepad" is for), it is also relatively easy to edit to make it clear and meet the requirements for certain types of documents. You can use different font types, adjust font size or colour, add headings, indent text, insert images and much more.
When you open the program, you may feel overwhelmed by the options you suddenly have, so we'll present just the essentials you need to work in Microsoft Word. Once you've got the hang of it, you can start exploring the other options.
We'll show you:
Microsoft Word is part of Microsoft 365, formerly known as Microsoft Office, which you can purchase from the official Microsoft website or from specialty stores. Today, you no longer need a CD to install it, but you can download the application directly to your computer from the Internet after purchase and install it according to the instructions that appear when you run the installer.
Increasingly popular is the option of a monthly or annual subscription to Microsoft 365, which includes Word and other applications. The advantage of a subscription is that the office suite is not tied to a single computer on which you install it, but you can log in from another device using your details.
There's even Microsoft Word online, which is completely free but has limited features. We'll look at the paid one next.
When you start Word and select the "blank document" option, you will be shown a "blank paper" to write on and a top bar used to edit the document. In the beginning, you will mostly work with the elements in the highlighted area.
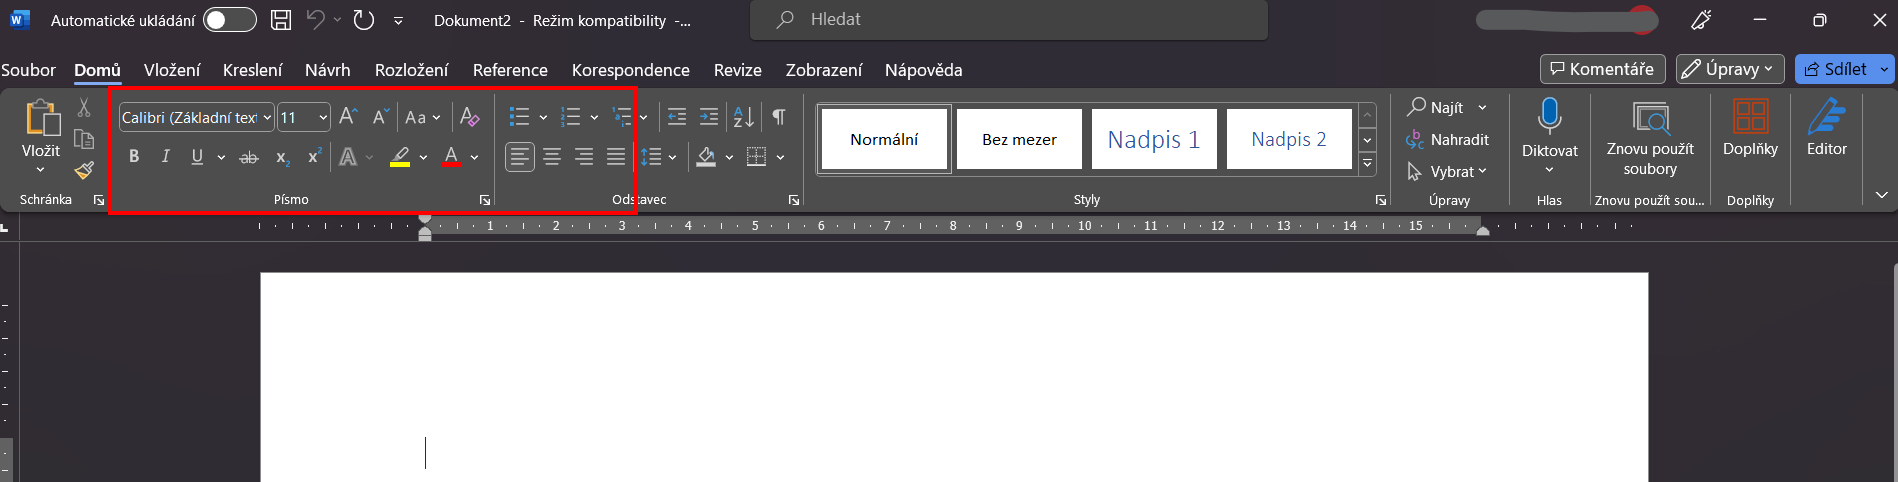
These are used for basic text manipulation. To use each feature, simply select the text (hold down the left mouse button and drag) that you want to modify in the selected way and click on the appropriate icon.
Or "font" defines the look of the font you want to use. For regular documents, the most common font is the default "Calibri" or "Arial" or "Times New Roman", which are comfortable to read. But you can also find fonts that look like handwritten etc. Click on the beak and choose from the list.
Can be set in the box next to the font types. The default is font size 11, some institutions (such as universities) prefer font size 12, but mostly it's up to your discretion.
Larger font sizes are useful for headings and subheadings (but you can also quickly and easily set them in the top bar under "Styles").
You can change the font size again using the beak, which will expand a list of options, or by using the capital "A" icons, one of which makes the font one order of magnitude larger and the other one smaller.
The "Aa" icon is for when you need to automatically set all the letters to ALL CAPS (called versals) or otherwise play around with the font style, but other than versals you probably won't normally use the other types.
Or "bold" - hence the "B" icon - will bold the selected text (you can also use the CTRL + B keyboard shortcut). This is useful to use to emphasize the most important information. In articles, we use bolding as an "eye anchor" to help the reader catch the most important messages. Click to start typing bold text (a second click turns the bolding off again) or highlight the text you want to bold and click.
Or "italics" hides under the "I" icon (you can also use the CTRL + I keyboard shortcut) and causes the text to take on a slight slant. In practice, it's used less than bold, and is used more to emphasize a change of meaning in the text or when you're writing someone's quote.
The underlined "U" icon, based on the English "underscore" (you can also use the keyboard shortcut CTRL + U), is used to underline text if you need to emphasize or differentiate something (but this is not used in formal documents - underlining is considered a typographical error). The "ab" icon allows you to strike out text. It can be useful if you and your colleagues are working on different versions of a text, and you discard one version but prefer not to delete it completely (in case you want to go back to it), so you just cross it out.
Tip: There is no icon in Word for deleting text, you delete the text using the "backspace" key directly on the keyboard (or the "delete" key). Backspace deletes the text to the left of the current cursor, delete deletes it in the opposite direction. The "A" icon with an eraser is used to clear the formatting, i.e. it returns the font to its basic form - without colors, underlining, etc.
You'll find an icon that really resembles a highlighter with a yellow bar underneath it. You can set its color with the beak, and then click on the icon itself to apply the highlight by dragging it over the selected text. When you don't want to highlight anymore, you click on the beak again and select "end highlight".
Located under the "A" icon with a red bar below it. Select your preferred colour again with the tab, use the mouse to select the text you want to change and click on the icon itself. The font colour will change. Or set the font colour and write straight in it for as long as you need to.
Note that depending on the color you choose, the color of the bar next to the icon will change as well. This means that this color is still selected and if you want to use it again, you don't have to select it from the menu again.
You can use the writing of indices - i.e. x2 or x2 - when writing mathematical formulae, area or volume units (e.g. m2) or when providing footnotes or quotations. So very rarely. And graphic fonts - the glowing "A" icon - are virtually unused.
Now let's take another brief look at the features that help with formatting blocks of text.
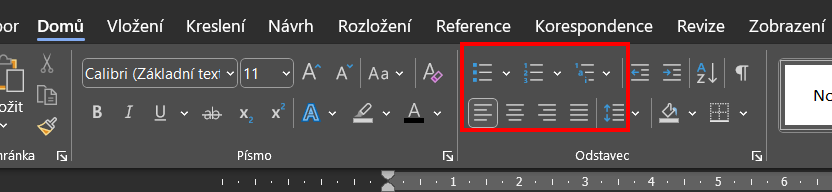
This is a very useful feature to make the text clearer if you are writing lists. The icon with dots and commas will trigger bullet typing (you can select the look you want with the beak).
When you've finished one bullet point, simply press the "enter" key and the next one will automatically appear below it. When you don't want to continue bulleting, press "enter" one more time to write nothing in the newly created bullet and press "enter" a second time. The cursor should return to typing in the normal paragraph again.
The adjacent icon with numbers works exactly the same way, it just uses numbering in the bullets.
The third icon in the row even allows you to type a multi-level bulleted list. But you probably won't use that one as much in the beginning.
Tip: The "AZ↓" icon (to the right of the highlighted section in the figure above) is also useful. It's used for alphabetical comparison, so if you have a list of clients or suppliers in Word, for example, you can easily sort them this way.
This is done using the icons in the bottom row of the panel marked by us. The first four allow you to select the font alignment. It is commonly left justified and most documents will do fine this way. But you can also center, right or "block" alignment, which means that the font is spread across the width of the entire line, making all lines the same length. The downside is that it also creates wider gaps between words, which can sometimes be distracting (also considered a typographical error in publications like "river").
The lines and arrows icon then allows you to set the spacing in Word - that is, how big you want the spaces between lines and paragraphs to be. The default is 1.15, but 1.5 is also common.
Tip: To start a new paragraph, simply press the "enter" key. Text divided into paragraphs is much clearer.
You can also use most of the functions described above much faster by using the so-called keyboard shortcuts. This means that you don't have to keep reaching for the mouse and swiping back and forth, but can set the font format (and much more) right as you type on the keyboard. This usually involves holding down the "CTRL" key in parallel with some other key.
That is, CTRL + some other key (the plus key only indicates a subsequent or simultaneous press of the other key, the plus key is not pressed here).
We have not yet mentioned an important function, which is pasting copied text. And copying what you have typed where you need it. That's what the most famous keyboard shortcuts are best suited for:
Tip: You can also use the right mouse button for these functions. When clicked, you will see a menu, with just the "copy", "paste" and "remove" options at the top. Of course, you can also paste and copy an image or a table.
You will also find the abbreviations useful:
Tip: Another useful feature is the "Replace" function in the top bar under "Edit", you can use it to replace one word or phrase with another throughout the document without having to manually rewrite it everywhere. The keyboard shortcut is CTRL + H.
Microsoft Word can alert you to some grammatical and stylistic errors. If it underlines your typed text with a red wavy line, it warns you that the typed word is not in its dictionary - it has a grammatical error, is a word from another language, or is a colloquial expression. It's a useful reminder that you'd better check the word.
Tip: When you click on an underlined word, you'll see suggested alternatives.
A blue wavy line will underline typographical and grammatical errors, such as a subject/object match or two spaces in a row, etc. When you click on the underlined area, Word will usually indicate what is wrong. But beware, it's not always right (although it usually is).
Remember, you don't put a space before a comma or a period in text. Instead, it is always placed after the comma and after the period.
Don't worry - the wavy underlines are just for you and won't show up in the printed document.
Tip: On the bottom left of the document, you can see how many pages you have written and how many words the document contains. When you click on the word count, you'll see a window detailing the number of characters and other information. Conversely, on the far right you have a scale bar that allows you to make your document larger or smaller to make it easier to write and read.
Save the document as soon as you create it (if you didn't create it directly in the folder, but launched the program and started writing), because Word will automatically save it after a few moments and you won't lose your work if the power goes out.
Click on "File" in the menu on the top left and select "Save", then name the file and select the destination folder where you will find it later.
You can also save the document using the CTRL + S shortcut.
And that's it. We hope you found the tutorial helpful. But remember, you learn best by working with the program alone, so feel free to open it up and try different things in your spare time. You can even explore other features we haven't mentioned. The controls are pretty intuitive, so don't worry. Good luck.
Where to next? You can also read how to create in Power Point from A to Z.

Copyright © 2026 - Algotech a.s., all rights reserved
| Personal data processing |
Terms and conditions